Summer has officially arrived, bringing a season of sudden, heavy downpours, flash floods, and severe thunderstorms. While a summer storm can offer a welcome break from the heat, it can also dump inches of water onto your property in a matter of minutes. If your home features a basement or crawl space, your sump pump is your first, most critical, and sometimes only line of defense against catastrophic water damage.
At Beeco’s Plumbing & Heating, we see firsthand how a single failed pump can lead to thousands of dollars in ruined drywall, destroyed flooring, and structural mold issues. To keep your home completely dry and give you peace of mind this season, we have put together this comprehensive, step-by-step guide to mastering your summer sump pump maintenance.
Understanding Your System: Submersible vs. Pedestal Pumps
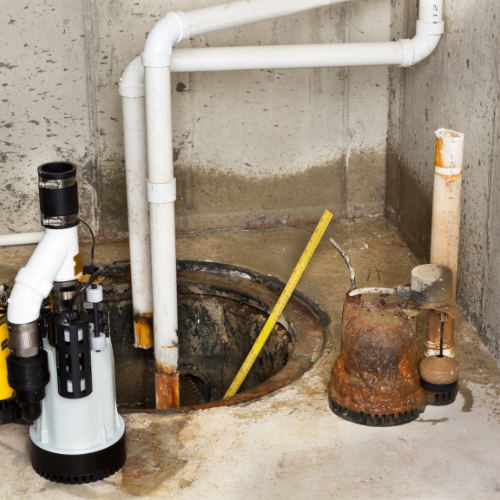
Before diving into maintenance, it helps to understand the anatomy of your system. Most residential homes utilize one of two main types of primary pumps:
- Submersible Pumps: These units sit entirely inside the sump pit. The motor is sealed in a waterproof housing and submerged in the water. They are typically quieter, more powerful, and safer if you have children or pets, making them the preferred choice for finished basements.
- Pedestal Pumps: These units feature a motor that sits on a shaft up above the sump pit, completely out of the water. While they are louder and more conspicuous, they generally have a longer lifespan because the mechanical motor isn’t constantly submerged.
Both styles rely on a float switch—a mechanism that rises alongside the water level. Once the float reaches a pre-set height, it clicks the switch, activates the motor, and forces water up through a discharge pipe and safely out of your home.
🚨 Quick Diagnostics: 5 Essential Maintenance Steps to Complete This Week
Don’t wait for a heavy midnight rain forecast to find out if your pump works. Run through these five quick checks to ensure your basement stays dry:
1. Perform the Technical “Bucket Test”
You can simulate a storm yourself in less than two minutes. Slowly pour a five-gallon bucket of clean water directly into your sump basin. Watch the water level rise closely: the float switch should lift smoothly without catching on the walls of the pit. Once the switch triggers, the pump should immediately kick on, empty the water rapidly, and cycle back off. If the motor hums loudly but the water level doesn’t drop, or if the pump fails to turn on entirely, you need to bring in a professional plumber immediately.
2. Deep Clean the Pit, Intake Screen, and Impeller
Over the course of winter and spring, dirt, silt, gravel, pet hair, and debris can wash into your sump basin. This debris creates a thick sludge at the bottom of the pit that can easily clog the intake screen on the bottom of your pump. If the intake is blocked, the motor will overheat as it struggles to pull water through. Disconnect the pump from its electrical outlet, lift the unit out, clear away any rocks or debris caught in the intake screen, and clear out the bottom of the basin before replacing the pump.
3. Inspect the Check Valve and Discharge Pipe Location
Your discharge pipe features a critical, one-way mechanism called a check valve, usually located just above the sump pit. This valve ensures that once water is pumped up and out, it cannot flow backward into the pit when the motor shuts off. If you hear a loud, slamming sound when your pump cycles off, your check valve may be failing. Additionally, walk outside and ensure the discharge pipe is completely clear of packed leaves or mud, and verify that the exit point channels water at least 10 to 20 feet entirely away from your home’s foundation.
4. Diagnose Internal Wear by Listening to Mechanical Noises
While no industrial pump is entirely silent, it should never sound like a blender full of loose gravel. Listen to a full cycle of your pump. Excessive vibrating, rattling, or heavy grinding noises are immediate red flags indicating a bent impeller shaft, worn-out motor bearings, or a failing internal motor drive. Catching these auditory warning signs early allows you to schedule a replacement on your own timeline.
5. Protect Against Outages with a Battery Backup System
Severe summer storms frequently knock out residential power lines right when rainfall is heaviest. If the electricity drops, your standard, outlet-powered sump pump instantly stops working right when you need it most. Investing in a dedicated battery backup sump pump system is the smartest insurance policy for your basement. These systems install directly alongside your primary pump and operate independently on a heavy-duty marine battery, keeping your home bone-dry for hours or even days until power is restored.
When Should You Replace Your Sump Pump?
Like any mechanical home appliance that operates under harsh, wet conditions, sump pumps do not last forever. On average, a high-quality residential sump pump has a reliable operational lifespan of about 5 to 7 years. If your pump is approaching or has sailed past this window, its mechanical reliability drops off significantly, even if it passes a basic bucket test today.
📋 Summary Checklist for Homeowners:
- Bucket Test: Passed / Failed
- Basin Debris: Cleaned / Needs Attention
- Check Valve: Quiet / Loud Slamming Noise
- Discharge Line: Clear and draining far from foundation
- Age of Pump: Under 5 years / Over 5 years (High Risk)
Need Professional Help? Call Beeco’s Plumbing Today!
If your sump pump is showing signs of old age, failing its testing sequences, or you want the bulletproof security of a professional battery backup installation, don’t leave your basement’s safety up to chance. The family-owned team at Beeco’s Plumbing is here to help with honest pricing, fast scheduling, and elite plumbing craftsmanship.
Don’t wait for the next severe weather warning. Contact Beeco’s Plumbing & Heating today to schedule your comprehensive system check-up and protect your home all summer long!